No products in the cart.
20
Oct
Oct
LIVE - Rebellion Reads Posts
Magnum Tattoo Needle Configurations Explained | Tattoo Equipment Evolution Pt. 5
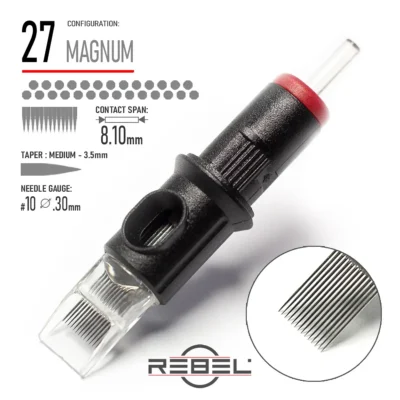
Magnum tattoo needles are a staggered two-row needle configuration used for shading, color packing, and smooth gradients. They are arranged in a zig-zag formation that distributes ink evenly across a wide surface in fewer passes, reducing skin trauma and improving heal quality. REBEL Precision Magnum Cartridges are available in configurations from 5M to 27M, all in #10 gauge with medium taper.
Guide to Magnum Tattoo Needle Configurations
Magnum tattoo needle configurations mark a major step in the evolution of tattoo equipment. Tattoo needles first appeared in simple hand-soldered bundles, then developed into different types and groupings that defined how artists worked. Liners brought crisp outlines, while round shaders allowed smooth gradients and soft fills. Building on this foundation, magnum needles emerged as the tools that expand shading and color-packing possibilities more than any other configuration.
New to REBEL?
Use code FIRST20 at checkout and get 20% off your first order.
How to Recognize Magnum Tattoo Needles
You can recognize magnum tattoo needles by their two-row, staggered layout. Unlike liners, however, which converge at a single sharp point, magnums spread out in a flat, zigzag formation. As a result, they deliver ink evenly across a wide surface, making them the go-to choice for shading, gradients, and color packing.
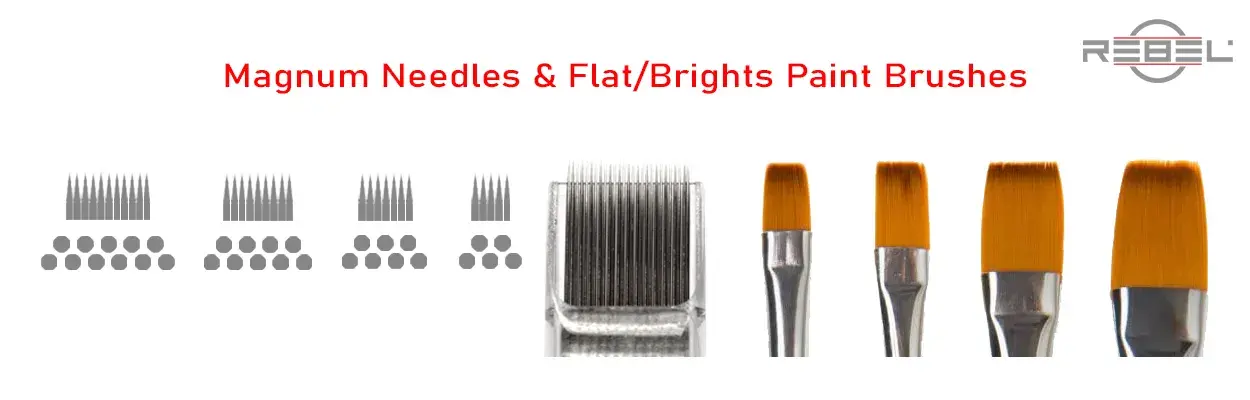
In addition, magnums act much like flat brushes in painting. Just as a flat brush covers larger areas with smooth, even strokes, magnum needles let artists create consistent tonal blends and efficiently fill broad spaces with color.
How Magnum Tattoo Needles Are Made?
In the past, artists soldered magnum tattoo needles by hand. They laid, for example, 17 needles flat in a single row and secured the cut ends. Then, using a razor blade, they lifted every other needle to form two staggered rows, creating a zigzag pattern from the front. This gave each needle space to hold more ink. The blade stayed in place while the artist soldered the needles together, fixing them permanently. This design allows magnums to hold and distribute more ink in a single pass than round configurations, REBEL Precision Magnum Cartridges making them ideal for smooth gradients, large fills, and deep, even saturation. Today, manufacturers handle this process, and tattoo artists purchase the finished needles ready to use.
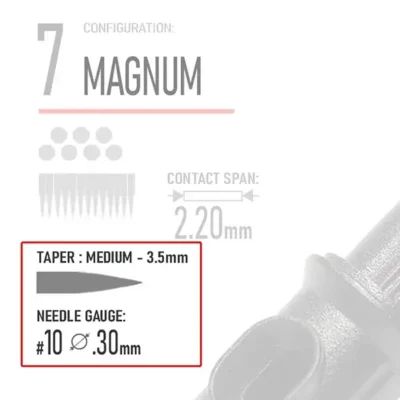
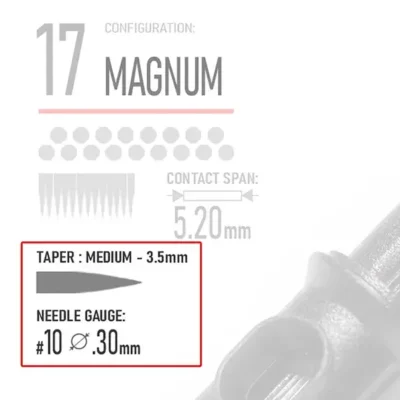
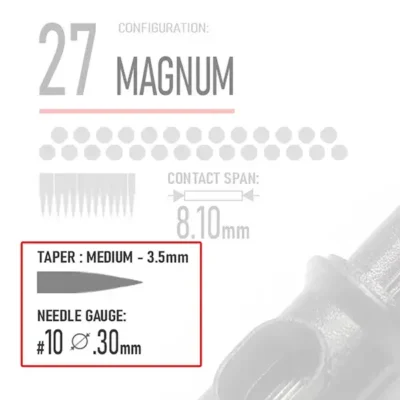
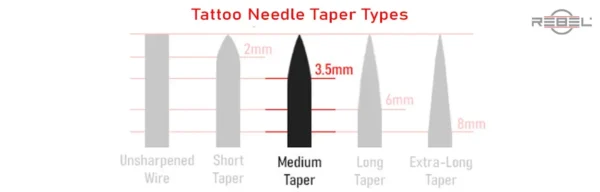
Note: The configurations of REBEL Magnum needles are MEDIUM TAPERED.
REBEL Contact Span Definition
The term Contact Span is a REBEL innovation. It defines the exact surface of the tattoo needle that touches the skin and leaves the inked mark in the shape of its configuration. Importantly, REBEL is the first in the industry to define needle groupings with this level of precision, reflecting our commitment to clarity and accuracy for professional tattoo artists. By doing so, we created a unified measurement that allows artists to compare different brands and their unique coding systems on equal ground. Ultimately, what matters most is how thick a line the needle produces or how much surface a configuration can cover when used for shading.
Contact Span in Magnum Tattoo Needle Configurations
Round needle groupings have a measurable diameter, but rectangular or staggered configurations—such as magnums—do not. Physically, a magnum forms a trapezoid, since the bottom row always contains more needles than the top. However, when ink loads on the needles and transfers into the skin, the impression looks more like a narrow rectangle because the two rows sit so close together. For this reason, it makes the most sense to describe Contact Span in magnums by width, which represents the actual skin surface a configuration covers in a single pass. Contact Span provides a clear and practical way to compare the coverage of magnums, flat needles, and other non-round configurations, helping artists choose the right tool for smooth shading, consistent color packing, and precise coverage.
Ready to try REBEL Magnum cartridges?
“These mags work great whether you are looking for soft b+g tones or blending colors.” — @tmh_tattoo, verified professional tattoo artist
Why Tattoo Artists Use Magnums
Tattoo artists often reach for magnums when they need to cover a large surface with solid color or smooth gradients. This doesn’t necessarily mean a back piece or sleeve always requires them—magnums excel wherever efficient color packing and smooth blending are needed, all while minimizing skin trauma. They also reduce the number of passes required, which further protects the client’s skin. Another advantage of this needle type is its flat, straight edge, which allows artists to use the corners to reach smaller areas without having to switch cartridges.
Variations Of Magnum Tattoo Needle Configurations
Magnum configurations have appeared in several variations throughout tattoo history, each experimenting with needle spacing and row placement to achieve different ink flow and coverage results. However, without standardized naming or labeling regulations across manufacturers, these variations were described inconsistently — the same configuration could carry different names depending on the brand or era.
Like many experiments in craft history, most of these configurations didn’t survive contact with professional practice:
- Tighter Row Variants: Needles packed closer together for denser coverage — increased skin trauma made them impractical.
- Wider Spacing Variants: More open needle arrangement for softer flow — inconsistent ink delivery led to their decline.
- The Survivor: The balanced configuration — two rows of equal-length needles in a zig-zag formation — outlasted the rest. The industry eventually named it the Standard Magnum. The name came after the dominance, not before it. Today it is also commonly referred to as a Flat Magnum or Regular Magnum — different names, same surviving configuration.
Magnum — The Configuration That Survived and Became Standard
Why did this configuration survive? Likely because it struck the most efficient balance between speed and healed quality. Optimal ink flow allowed artists to cover large areas in one or two passes without overworking the skin — solid saturation, minimal trauma, faster healing, and a result that held up long after the session. No excessive touch-ups, no compromise on quality. That combination made the Standard Magnum the reliable foundation of shading and color packing in professional tattooing. Today, however, only a handful of old-school artists still reach for it — and with each generation that moves on, the Standard Magnum edges closer to extinction.
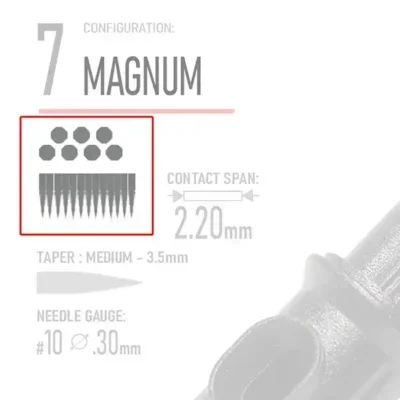
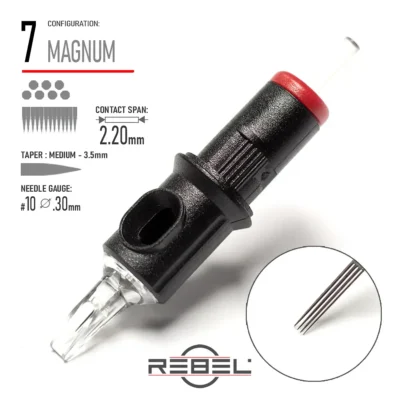
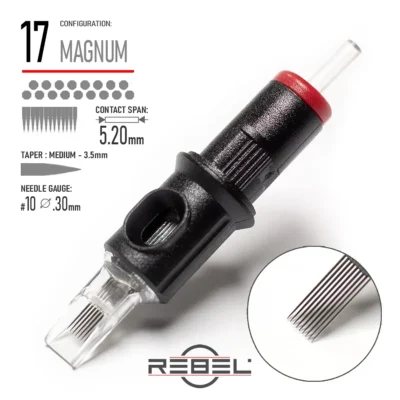
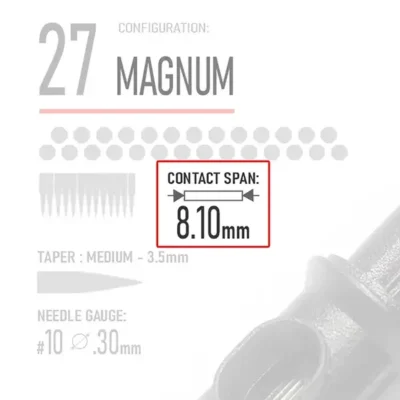
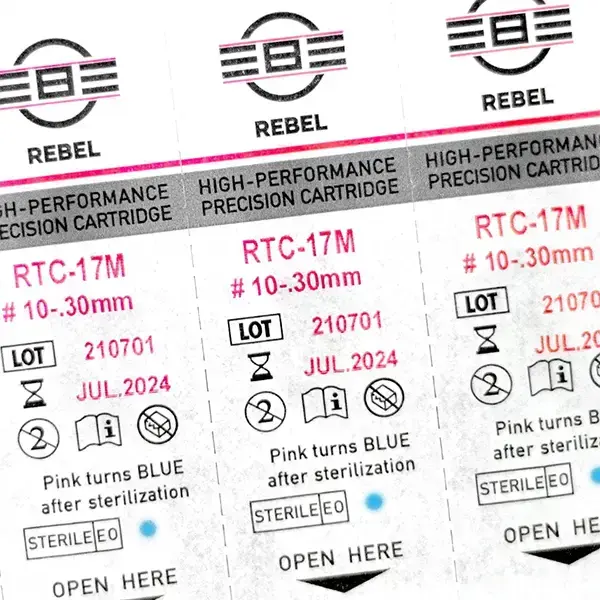
Every REBEL magnum configuration card shows needle count, Contact Span, taper length, and gauge at a glance — no guesswork, no decoding required.
Standard Magnum — staggered two-row flat configuration. Ideal for solid color packing, smooth shading, and precise corner work.
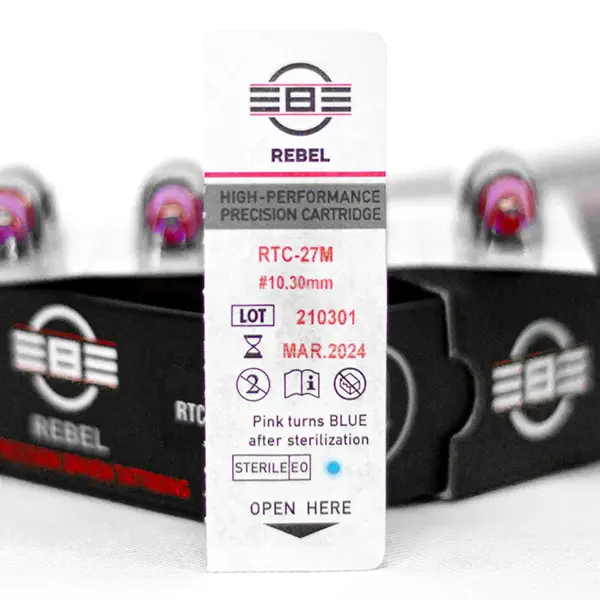
REBEL packaging clearly indicates the gauge at a glance using M = Magnum abbreviations. For example:
- 27 Magnum: RTC-27M, where M stands for Magnum (#10 needle gauge)
Theoretical Magnum Tattoo Needle Manufacturing Variations
While magnum needles always follow the same staggered two-row principle, their exact build can vary depending on gauge and needle count. Different gauges may produce the same overall Contact Span, meaning two magnums can cover the same skin surface but deliver different ink flow, saturation, and feel. This overlap creates multiple manufacturing possibilities, but in practice, only certain combinations prove efficient and artist-friendly.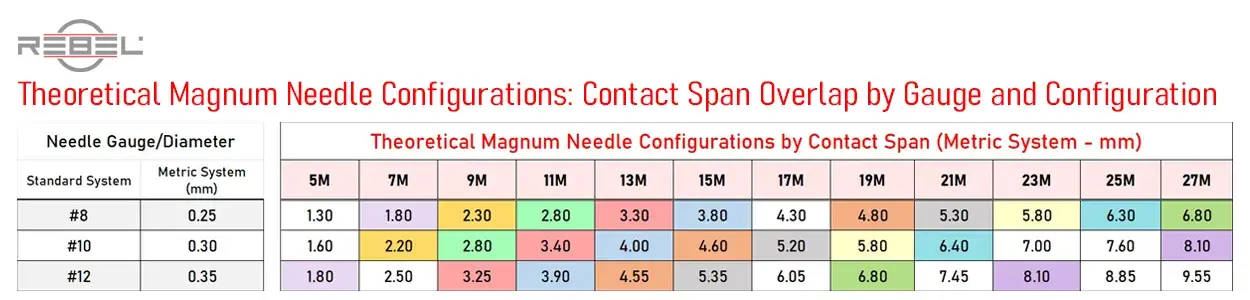
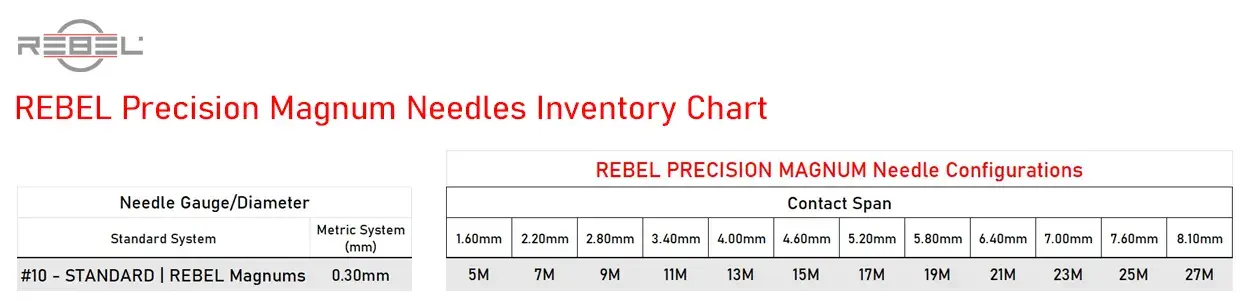
REBEL Magnum Inventory Strategy
At REBEL, we designed our magnum tattoo needle inventory to cover a wide range of Contact Span. This ensures that artists can select the perfect configuration for their style—whether packing bold color, creating smooth gradients, or blending subtle black-and-gray shades.
Note: The configurations of REBEL Magnum needles are #10 (0.30mm) and MEDIUM TAPERED.
What Professional Artists Say About REBEL Magnum Cartridges
“These mags work great whether you are looking for soft b+g tones or blending colors.” — @tmh_tattoo, verified professional tattoo artist
“Beautifully soldered, consistent quality and precise. No side play, high-quality steel pins — skin trauma is minimal and healing is faster. Customers can sit longer, artists work faster. That’s more value for everyone in the room.” — Killer Silver Ltd, REBEL Authorized Distributor
Find Your Magnum Configuration
Which Magnum Configuration Is Right For the Job?
Regular Magnum needles feature equal-length needles in a straight, flat configuration. That straight edge gives you usable corners — letting you reach tighter areas and create more precise edges without switching cartridges. The wider the Contact Span, the more skin you cover in a single pass — a 5M handles precise smaller fills while a 27M handles large-scale shading and color work. If smooth gradients and soft blends are your priority, stay tuned — Curved Magnum configurations are covered in depth in Part 6.
What Does Contact Span Mean For Magnum Needle Selection?
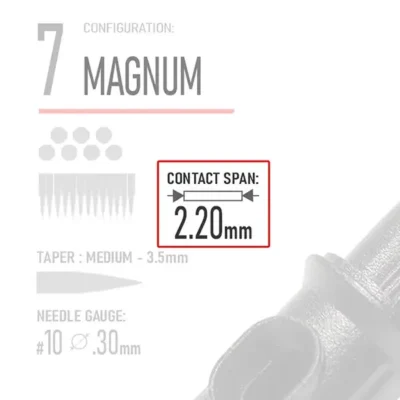
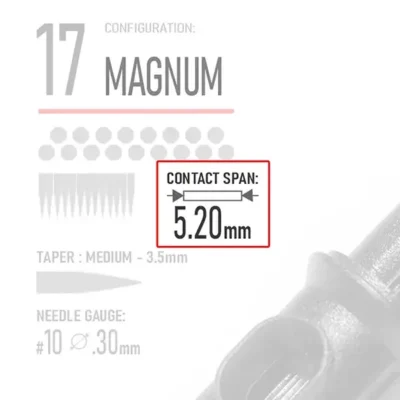
Contact Span defines the exact width of skin surface a magnum configuration covers in a single pass. A wider Contact Span means faster coverage but less edge precision. REBEL Precision Magnum Cartridges range from 5M (1.60mm) to 27M (8.10mm) — a Contact Span for every scale of work, from detail shading to large color fills. All configurations are #10 gauge and medium tapered
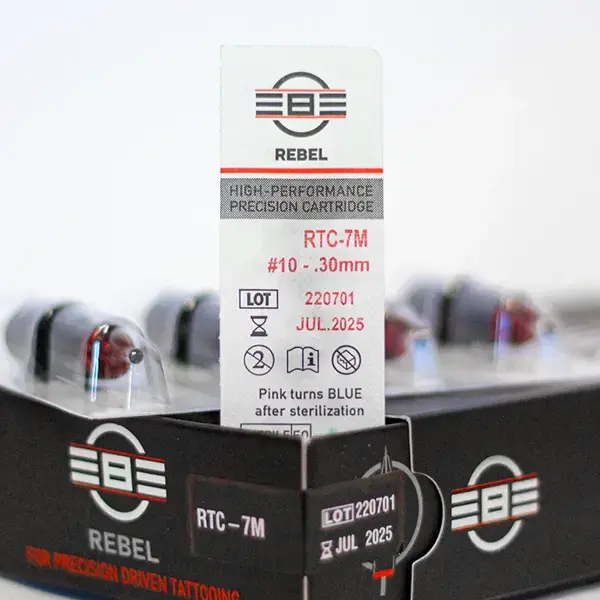
Where Can I Order REBEL Precision Magnum Cartridges?
REBEL Precision Magnum Cartridges ship from New York Metro. First order? Use code FIRST20 at checkout for 20% off.
SHOP REBEL PRECISION MAGNUM CARTRIDGES
Conclusion
Why REBEL Magnum Cartridges Define The Standard
Magnum tattoo needle configurations transformed shading and color packing in modern tattooing. Through their staggered two-row design, they let artists work efficiently across larger surfaces while maintaining precision and control. REBEL Precision Magnum Cartridges are built to that exact standard — medium tapered, #10 gauge, engineered for professional artists who won’t compromise on consistency.
Explore
Every configuration. Every Contact Span. Built for the work you do. Browse the full REBEL Magnum inventory and find the configuration that fits your style.
Read On
From here, continue with Curved Magnum Tattoo Needle Configurations Explained – Part 6 of the Tattoo Equipment Evolution Series. You can read back on Part 4 – Round Shader Tattoo Needle Configurations or browse all posts in Rebellion Reads.
Spread The Knowledge
If this guide helped you understand magnum needle configurations, share it with an artist who’s still figuring out their shading setup. The more we understand how our tools are built, the higher we can set the standards of tattooing.
Make Your Voice Heard By Leaving A Comment
Have a question about magnum configurations, Contact Span, or how REBEL cartridges perform in your style? Drop it below — Caesar reads every comment.
“When you understand your needle type, every stroke becomes predictable — and predictability is precision.”

Hi Caesar!
Thank you for your informational blog on needles. I’m an RN who also does permanent make-up. I’m curious what your thoughts are re: needle size/configuration. I use a single needle to outline the lips but struggle on what to use for filling/shading the lips. Mostly I use a single needle but it takes about 5 hours which seems very long for such a small area. I’d appreciate your help and would love to buy some cartridges from you!
Hello there, thank you for your comments. Honestly, I’m not a makeup artist and don’t even know one, thus I can’t really give you a responsible answer. I personally don’t use single needle liners in my tattoo work. If I need a fine line one of the REBEL Bugpin liners like 3 or 5 would be an ideal replacement. For the filling part, I probably would go for around shader or magnum/curved magnum configuration. But again, I have not made up tattoo experience.